Introductory discounts!
Save 20% and more on ChordConverter - valid until 2025/07/20 🔥
Special bundle sale: 25% off on ChordPotion + ChordConverter Plus.
Introductory discounts!
Save 20% and more on ChordConverter - valid until 2025/07/20 🔥
Special bundle sale: 25% off on ChordPotion + ChordConverter Plus.
MelodicFlow is a MIDI VST and AU plug-in for Windows and macOS. MelodicFlow makes it easy to play and create melodies instantly. Even if you don't play the piano or know scales by heart: You will never sound off, as all your input is mapped to fitting notes instantly.
MelodicFlow includes several operation modes that allow you to easily implement different playing styles without knowing much about music theory.
For example, the "Scale Bender" mode can be used to always stay on the appropriate scale (over 300 scales included!). Even if you play the wrong note. Or use the "Mood Board" to quickly change the mood of a melody from happy to sad, or from apathetic to angry.
Each mode shows a keyboard display. The keyboard area can be used to see both the notes that you hold down on your keyboard ("input" => completely filled keys) and the resulting output notes (=> small boxes).
You can switch between different operation modes by clicking on the combobox right next to the page buttons in the top bar. The page buttons can be used to work with up to eight different settings. This is useful if you want to work with different scales or want to experiment with the settings.
A built-in MIDI recorder can be used to memorize your played melodies. You can export the data as standard MIDI files via drag and drop. This makes it easy to edit the notes in your DAW later on.
Terminology: In this guide, the word "trigger note" refers to the note that you hold down on your keyboard. When you press a trigger note, MelodicFlow will generate an "output note" for you. In most cases, this output note will be different from the note that you pressed on your keyboard.
Depending on your DAW and your operating system you will need to copy the plug-in to a different location. The most common locations are:
Windows (64-bit DAW): Copy the file MelodicFlow2_x64.dll to the folder "c:/program files/Steinberg/VstPlugins/" (this is the default for most 64-bit DAWs).
macOS: Copy the file MelodicFlow2.vst to the folder "/Library/Audio/Plug-Ins/VST/". Copy the file MelodicFlow2.component to the folder "/Library/Audio/Plug-Ins/Components/". Please note: The AU version (MelodicFlow2.component) is only needed for Logic Pro X. Most other hosts (e.g. Ableton Live) will need the VST version instead.
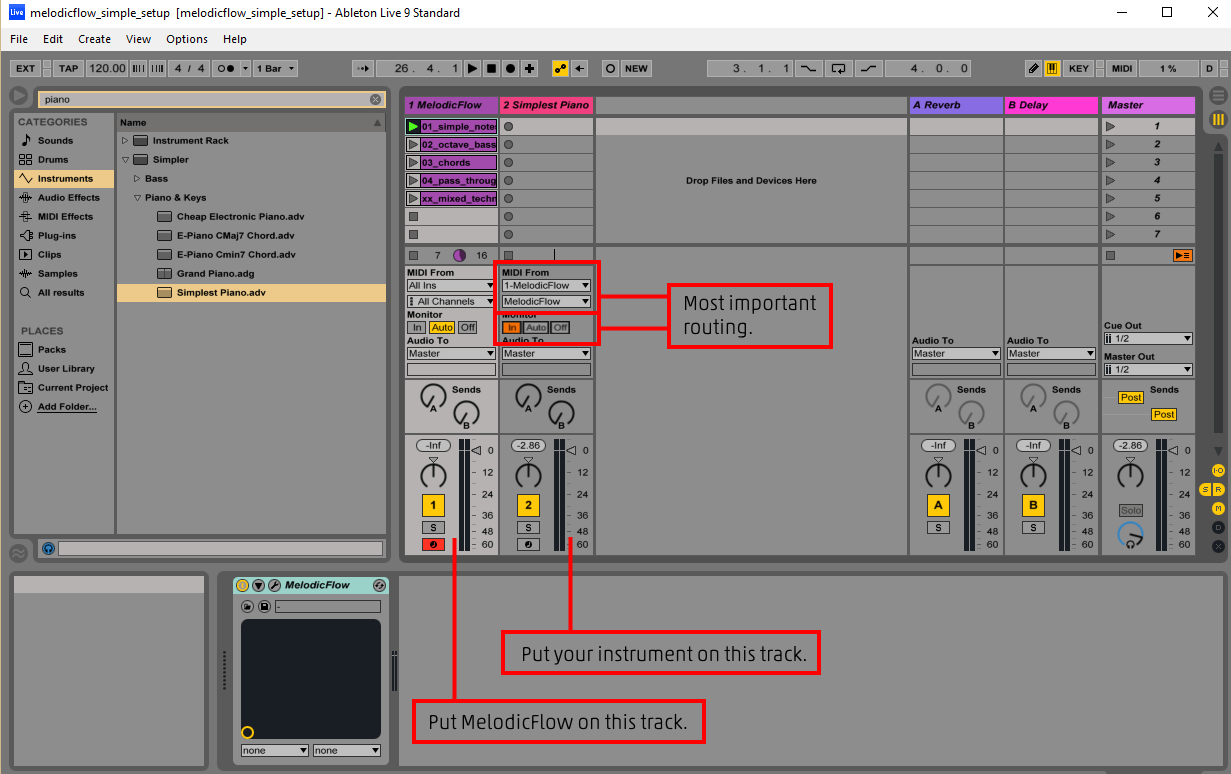
MelodicFlow acts as a VST instrument or AU MIDI effect inside your DAW. It receives notes like any other instrument and can send the newly created notes to other plug-ins. The VST versions also include a built-in sound module that can be used to work with MelodicFlow without connecting it to other instruments.
Please consult the manual of your DAW to find out how you can pass the MIDI note output from one VSTi to another plug-in. Some pointers:
Use this mode to play any scale without hitting the wrong notes by accident.
Simply pick a scale and play on the keyboard as usual. If you accidentally play a note outside the scale, MelodicFlow will play the nearest correct note instead.
Tip: You can use this mode to "convert" any MIDI file from one scale to another. Simply pick a MIDI file, press play in your DAW, and let MelodicFlow bend the notes to your chosen scale. Then stop the playback and drag and drop the recorded MIDI data to your DAW.
This mode lets you play any scale without remembering the correct notes.
This is how it works:
Use the "Mood Board" to create melodies that fit a specific mood you have in mind. You can switch between different emotions at any time using the black keys.
The mode works like this:
Please note: Pressing a black key won't play any note. It only computes the set of notes that you can then play on the white keys.
Tip: You can also press the same black key a second time to compute a different set of notes with the same emotional quality. It depends on the scale if this is possible, but all the standard Western scales will work.
The "Piano Player" is another mood based operation mode. Choose a playing style that you want to simulate and then press certain trigger notes to create a melody. Depending on the playing style, MelodicFlow will calculate melodic output notes that are arranged in a specific way.
This is how it works:
The Advanced mode is more complicated than the other modes. But it has a strong advantage: As soon as you master it, you can harmonize your melodies to existing chord progressions.
In principle, it works like this: You play your chord progression on the lower octaves of the keyboard. Then you play on the white notes of the higher octaves. MelodicFlow will harmonize these "trigger notes" to your chord progression then.
Example files:
Please download the Advanced Mode Example MIDI Files here:
melodicflow-advanced-mode-midi-examples.zip
Unzip the package, then drag the MIDI file "xx_mixed_technique.mid" on the MelodicFlow track. Set the operation mode of the current page to "Advanced". Then play back the clip and your DAW should play back a melody then.
The following video explains the Advanced mode in detail.
Attention: Please note that the video shows MelodicFlow 1.0. The Advanced mode of the current MelodicFlow version works exactly the same way, though.
This is how the mode works:
The Advanced mode contains several other sub-modes that automatically bend your melodies to the right notes. MelodicFlow analyzes the chords that you provide and then creates a selection of fitting notes for you.
You only need to play on the white notes on the right side of your keyboard (yellow area). Concentrate on the melodic rhythm and MelodicFlow will sort out the rest for you.
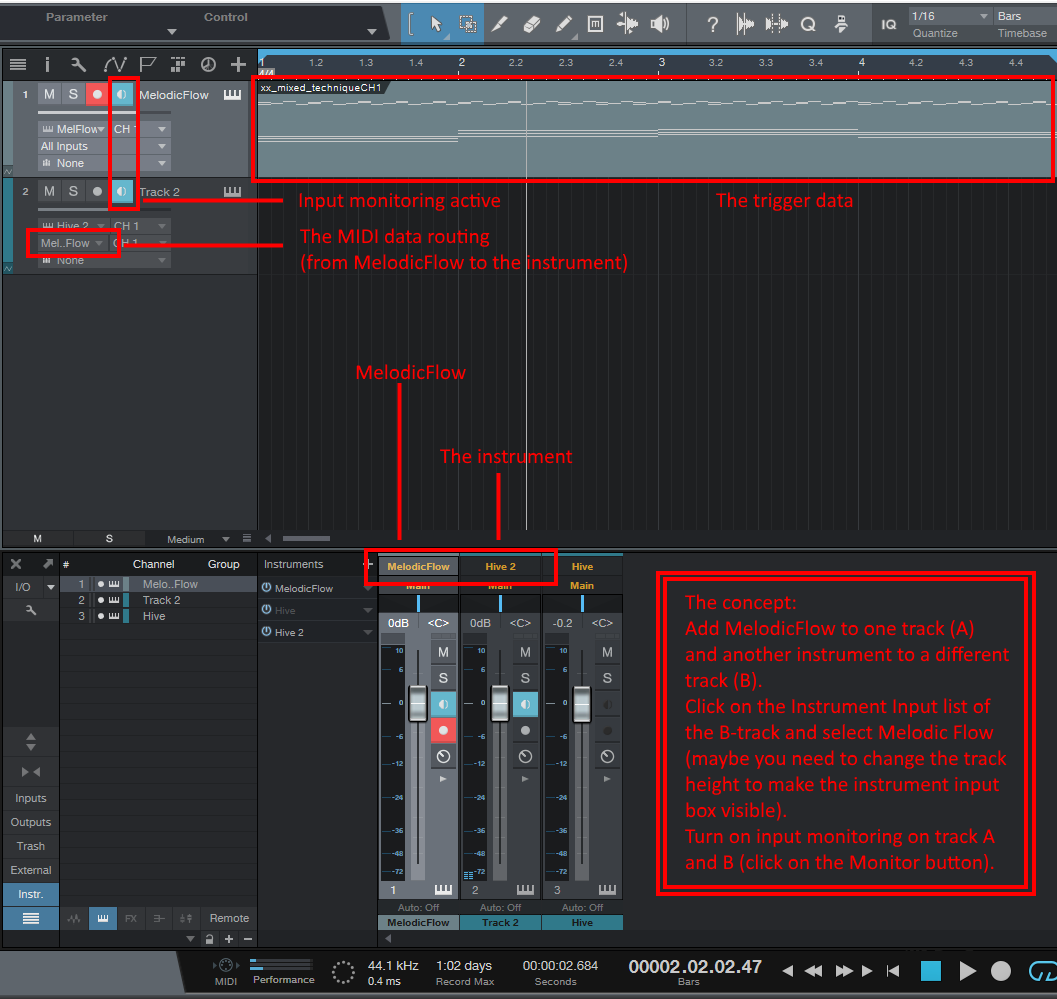
Please take a look at the image below:

The yellow notes in the red circle "1" are routed from your keyboard to MelodicFlow. MelodicFlow uses these chord notes as its base input to calculate possible output notes. You cannot hear these notes, as they are only used internally (except when you turn on "Pass notes through").
The possible output notes can be seen in the red circle "2". They are shown as small white boxes on top of the keys. In this example, they are built from a mix of safe scale notes and chord notes, as the operation mode is set to "Scale + chords (safe)" (bottom left box).
If you play on the white notes of the yellow area, MelodicFlow will map your input to the calculated output notes now. The C in the red circle "3" will always play back the first white box, the D will trigger the second box, and so on. You can use the white notes below the "root C" as well.
This is all you need to know to get started with the "Advanced" mode. There are also special black keys that trigger chords or transpose notes. Please take a look at the rest of this manual to learn more.
The different Advanced sub-modes: "Chords", "Scale",...
The Advanced mode contains several sub-modes that influence how the possible output notes are calculated. As mentioned in the introduction, the possible output notes are represented as small white boxes on the keys.
The following sub-modes can be used:
Transposing single notes

Hold down the F# in the red circle 2, then press a white note (e.g. the one in circle 1). The resulting note is played back one octave higher than usual now. The G# pitches the note up by two octaves. The G# and the A# in the red circle 3 work the same way, but they pitch the note down by an octave (A#) or two (G#). Use these "single note mod" switches to play melodies and basslines on different octaves.
Example file: 02_octave_bassline.mid (inside the "midi-examples" folder which you can download here)
Transposing all notes
Use the Transpose octave section of the user interface to transpose the output notes by a certain amount. This way you can re-use the same chords for both basslines and higher instruments.
Playing chords

Press the C# in the red circle 1 to trigger all notes of the current chord. The D# triggers the same notes, but one octave higher. The C# and the D# in the red circle 2 pitch the notes down by one octave / two octaves.
Example file: 03_chords.mid (inside the "midi-examples" folder which you can download here)
Activate Trigger big chords in the user interface if you want to strengthen the first note of the current chord (bass note). Now the bass note will be played back one octave below the original bass note as well. This is very nice for big pad sounds etc.
Pass notes through
Sometimes it is desirable to play back the notes as soon as you hold them down in the blue octave range.
Scenario 1: Click on Pass notes through in the user interface. Now all notes will be played back as soon as you hold them down. Perfect if you want to work on your chord progression and listen to your notes directly.
Scenario 2: Hold down the A# that is marked as "Pass notes through" in the user interface. Now all notes will be played back directly, too. But this time the Transpose octave mod is applied as well. This option is interesting if you want to create melodic patterns that react to chord changes instantly.
Example file: 04_pass_through.mid (inside the "midi-examples" folder which you can download here)
Expanding the yellow playing area

Click on the small arrow button to expand the yellow playing area to the left. This is useful if you need to play melodies that go way below the main octave notes.
The VST version of MelodicFlow contains a built-in sound engine.
You can activate and deactivate the sound engine by clicking on the loudspeaker symbol.
Click on the arrow to the right to switch between different preview sounds.
MelodicFlow can automatically record the output notes for you. You can drag and drop the resulting MIDI file to a track of your DAW and then edit it as you like.
The recorder works like this:
You can repeat this process as many times as you like. MelodicFlow will always clear the previously recorded material and start with a fresh recording.
You can switch between pages using one of three ways:
There is an advanced way to work with MelodicFlow that will require some initial setup efforts. It is only useful if you use the "Advanced" operation mode a lot. But the rewards are high: You will be able to create new tracks faster and better by recycling melodic rhythms and ideas again and again. Very useful for common basslines, arpeggios, chord rhythms, etc.
Read more about it here: https://feelyoursound.com/chord-master-track/
The Audio Unit (AU) version "MelodicFlow.component" is only recommended for Logic Pro X on macOS. If you work with a different DAW, you should use the VST version instead (most DAWs don't support MIDI-AUs at all).